From (by)
RocketSlinger@SBCGlobal.net
(email me there please)… This is a sub-site to main site at www.rocketslinger.com …
This
web page last updated 03 Oct 2021
Harvesting and Managing Energy While Re-entering
an Atmosphere Using a Shuttlecock Design
Abstract / Pre-Summary
This
sub-page to www.rocketslinger.com is a
companion or supplementary document to another document found at https://www.researchgate.net/publication/354612024_Methods_of_Decelerating_a_Spacecraft_Through_Atmospheric_Re-entry_Using_a_Shuttlecock-like_Design and at http://www.rocketslinger.com/BadMinton/ (same document, 2
locations). In BOMs (Bills Of Materials) lingo, the “parent” BOM calls a “child” BOM,
where the child is a sub-assembly of the parent. This document deals with sub-assemblies of
the designs described in the “parent document”, and so, it will henceforward be
referred to as the parent document for brevity.
Temperatures
endured during re-entry (both on the windward and lee sides) are briefly
examined here, as are temperature tolerances of materials and
subassemblies. Then a “heat wall” design
is described, which can be used to protect subassemblies from heat damage. Much of this is focused on hydraulic
machinery, which will need to be used to control the “petals” (or grid fins) as
were described in the parent document.
Many variations of
a powered hinge are described here. One
of the best versions consists of a curved (arc-shaped) friction plate attached
to each petal-becoming-a-grid-fin (AKA, fairing segment). The friction plate is gripped between two
powered, slowly rolling funnel shapes, to create a torque-limiting device, to
absorb sharp peak loads without damage.
This hinge system is called a “Bifrost Hinge”, and the name given to it,
is explained.
To harvest energy
(or power used to perform work) in a spacecraft entering an atmosphere, we
could use roller chains similar to (but larger and stronger than) the chains
used in bicycles and chain saws. In a
chain saw, some of the plates (in the chains) are extended outwards with teeth,
for cutting wood or other materials.
Here, instead, some of the plates are extended outwards to “catch the
breeze” during re-entry, the same as windmill vanes catch energy from the
wind. The overall device, then, here,
will be called a chain windmill.
The vanes in such
a device could possibly take many forms, but two are described here. One is a single plate per each set of
chain-plates that is so equipped, which is stopped (by a hard-stop) from
folding past 90 degrees, with the right angle formed to “catch wind”, and not
fold further towards the lee side.
However, this vane is allowed (during the chain segment’s return journey
towards the windward side) to fold out of the way of the prevailing wind.
The alternate
(here-described) vane is a “butterfly vane set”, with twin segments that “flap”
to catch wind in one direction, and fold out of the way in another
direction. They can each perform a partial
rotation around pins protruding outwards from each pair of roller-chain plates
that is so equipped. Each of the two
twin vanes (“butterfly wings”) provides the hard-stop for the other, in this
design. In either form, a chain windmill
is not at all an optimal solution here, for us.
An
energy-harvesting device could also resemble a paddle wheel on a
riverboat. This approach will be far
less disadvantaged by lack of lubrication than a chain windmill would be. And as will be shown, lubrication WILL be a
major problem for the chain windmill (unlike the paddle wheel).
Also described
here is an airflow spoiler that could be placed to the windward side of the
energy-harvesting device, possibly sized and located in a compromise between
partially protecting the energy-harvesting device (best choice being a paddle
wheel) from too much heat and strong airflow, and not getting enough airflow to
harvest enough power. The spoiler is
composed of a hinged heatshield-covered plate that can be thrust out into (or retracted
from) the airstream. It could be
activated by a (heat-walled) “Bifrost hinge”, which could also double up as a
“hydraulic battery” used to store extra power.
These are sometimes called “hydropneumatic accumulators”. In the design context here, the variably pressurized
nitrogen in such a device could be partially or entirely replaced by the variable
pressure of passing air in the airflow spoiler (which pushes on the plate). Such a design choice may have to be balanced
with the other possible purpose of the spoiler, which is to partially protect
the paddle wheel.
The body of this document contain
far more details, and sometimes-implausible variations. However, the above covers the most important
basics.
As with other sub-pages of www.rocketslinger.com, the intent here is to
“defensively publish” propulsion-related (and “misc.”) ideas, to make them
available to everyone “for free” (sometimes called “throwing it into the public
domain”), and to prevent “patent trolling” of (mostly) simple, basic ideas. Accordingly, currently-highly-implausible
design ideas (usually marked as such) are sometimes included, just in case they
ever become plausible, through radical new technology developments (often in
materials sciences).
Introduction / Basics
Please read the abstract above… Some of those basics may
not be thoroughly (completely) repeated here below.
Dear Reader, excuse me as I will often slip out of
stilted formal modes of writing here. I
have no boss or bosses to please with these writings,
so I’ll do it my way! I’ll often use a
more informal style from here on in, using “I”, “we”, “you”, etc. “We” is you and me. “You” are an engineer, manager, or other party
interested in what’s described here.
The parent document describes what I
now briefly summarize: Payload fairings
can be built with embedded grid fins buried inside other materials (plastics, etc.)
that will burn, ablate, or fall away in the heat of re-entry. The fairings segments (4 of them being a good
number here) can also be arranged on hinges that join them to the base of the
payload section. The only sensible
option here is for those hinges to reside outside of the circular profile of
the cylindrical rocket body, and of the base of the fairing. This, then, I call a “partial hammerhead
design”, where, in fairings lingo, the “hammerhead” design refers to the girth
of the fairings (at the base of the payload cavity) exceeding the girth of the
rocket body.
The
hinged fairings splay out from their base like the petals of a flower open up,
so here they are called “petals”. The
payload is deployed, and the de-orbit burn is performed. The petals stay deployed or partially
deployed till the plastic or other “sacrificial materials” ablate or fall away;
now the petals become “grid fins”. Via
“powered hinges”, the grid fins (which were formerly petals) can now be
adjusted more-open or more-closed. When
this is done in a rolling-around-the-circle pattern, we can induce a
heat-spreading “rotisserie roll” in the body of the rocket, as we descend.
No
details were given (in the parent document) about how the
“powered hinges” should be designed and built.
Here, I will present my moderately-educated
ideas about how to do so. OK, more
honestly, here come my best SWAGs at doing this, and associated things! Further below, of course.
The parent
document also briefly
describes what were there called “screw-propellers”
or “screw turbines” as energy-harvesting devices. There are a few mentions here of associated
ideas. But, presumably at the base of
these screw turbines, we would want to add hydraulic pumps (far more likely) or
electrical generators (far less likely) to harvest energy. Either way, the pumps or generators would
have to be shielded from ambient heat during re-entry. Heat-shielding will be addressed in some
detail, further below. Heat-shielding
discussions are new here, compared to the parent
document. Anyway, the screw-propellers or
screw-turbines are dismissed here as not being very suitable for our use,
especially as compared to a paddle-wheel design.
I’ll
describe “chain windmills” here (see a brief summary in the abstract above), as
an alternative to “screw turbines”.
Their best energy-harvesting modes would also be to drive hydraulic
pumps. The other choice is electrical
generators. Why do we chose
hydraulic pumps? See https://sciencing.com/differences-hydraulic-motors-electric-motors-7351549.html “Differences Between
Hydraulic Motors & Electric Motors” and http://info.texasfinaldrive.com/shop-talk-blog/hydraulic-motors-vs-electrical-motors-why-hydraulic-wins “Hydraulic Motors vs
Electrical Motors: Why Hydraulic Wins”.
Motors
v/s generators considerations are VERY highly similar here! Also, the more times we convert one form of
energy to another (oil pressure to electricity or vice versa), the more energy
we lose to inefficiencies. So we’ll stay
mostly hydraulic here, per my preferences, in these design notes.
Airflow
spoilers and “hydraulic batteries” (“hydropneumatic accumulators”) are also mentioned in
the abstract. They are also discussed in
much more detail below. Let’s move on!
Internet Research on Relevant Facts About Re-Entry Heat and High-Temperature Materials and
Subassemblies
Here, we assume re-entry is from low Earth orbit. Any higher-speed re-entry seems to be out of
reach with current materials and technologies, for any kind of “shuttlecock”
re-entry style, as described here.
The below is some fairly cursory internet research on
associated matters, to be used to guide our design work here. My general intent here is to conduct “amateur
public-domain rocket science” (AKA “open source”), so, as usual, your comments
questions, and contributions are welcome at RocketSlinger@SBCGlobal.net. So, in accordance with my intent, research
matters (links) that are NOT used here (but are highly relevant, and could be
used by others) are included here. We generally
start with the most-relevant, and conclude with the least-relevant.
Temperature
Tolerances Needed… Assuming re-entry
from low=Earth orbit, of course. https://en.wikipedia.org/wiki/Atmospheric_entry is
of general interest. https://www.airspacemag.com/how-things-work/shuttle-tiles-12580671/ “Shuttle Tiles” is subtitled “Why the space shuttle can
withstand reentry temperatures up to 2,300 degrees.” https://www.nasa.gov/centers/ames/research/2007/faq-shuttleglass.html says (about the lee as opposed to windward
side)…”This side experiences lower high heat transfer compared with the
windward side, and so it does not reach as high a temperature. This is because the pressure is much lower, at
least two orders of magnitude lower (1/100 or less pressure) on the back side.
The hot gas on the windward side expands to the leeward side, which means the
pressure drops quickly, and so does the gas temperature. (Deletions by me here). So windows must still be able to withstand
high temperatures, say about 1000
C. So Shuttle
windows are made from a high-temperature quartz glass that can withstand
heating and cooling without cracking.”
https://www.daviddarling.info/encyclopedia/R/reentry_thermal_protection.html says almost the
exact same thing as above.
Note that 1,000 C = 1,832 F. There’s a handy C to F converter at https://www.google.com/search?q=Centigrade+convert+to+fahrenheit&oq=Centigrade+convert+to+fahrenheit&aqs=chrome.0.69i59.225990j0j4&sourceid=chrome&ie=UTF-8. Also (importantly!) note that the “lee” side
is about 100 times lower in pressure than the “windward” side. https://www.nasa.gov/mission_pages/constellation/orion/orionheatshield.html says “The shuttle enters the atmosphere at lesser
speeds, 4.7 miles (7.5 kilometers) per second, generating a lower maximum
temperature of 2,900
degrees Fahrenheit”.
So we can conclude
that our temperature-tolerance targets are about 2,300 F to 3,000 F or so for the windward side
then, and 1,832 F
for the lee side. These are our temperature-tolerance
targets. Also importantly, note that
windward side pressures can be about 100 times as much as lee side pressures.
Metals to be used? General knowledge (trivial to look up) is
that the melting point of titanium 3,034°F. Alloys of
stainless steel also work. https://www.businessinsider.in/bird-poop-and-dust-could-seriously-complicate-elon-musk-and-spacexs-latest-plan-to-reach-mars/articleshow/68085712.cms is relevant… From there…
“Musk has said the nose of Starship
may be exposed to temperatures of about 2,700 degrees Fahrenheit. The type of
steel alloy SpaceX may use on Starship's outer skin, called 310S, melts
at about 2,400 degrees.” (My comment; so they need heat shielding
there at the nose).
In passing, let me add, ceramics are
of interest as well. They’re generally
good in “compression” modes, but not in “tension” modes. Bending and torsional stress modes are
therefore dicey for ceramics! I still
think metals are better for most of what high-temperature and high-stress
structural uses are described here. But
you might want to look into the materials used here: https://www.imperial.ac.uk/news/176628/new-record-worlds-most-heat-resistant/ “New record set for world's most heat resistant material”, which says that “Tantalum carbide (TaC) and hafnium carbide (HfC)
are refractory ceramics…”, and a ceramic made of them is rated at up to nearly
4,000 C, or 7,232 F!
We want to use hydraulics a LOT
here! An obvious place to start is the
hydraulic fluid itself. The following
web site discusses new high-temperature TARGETS for the fluids, so this is
best-case! https://onlinelibrary.wiley.com/doi/abs/10.1002/jsl.3000090203 “The
rationale is presented for the development of 315 °C bulk oil high-temperature hydraulic fluids…” 315 C = 599 F, so we must
conclude that any hydraulic gear (to include pipes or hoses) MUST be
heat-shielded!
I am NOT (here, much) recommending
the use of hydraulic cylinders, but they’re certainly an option, if properly heat-shielded. Keep in mind that, if you use these, the
fluid isn’t the only heat concern. https://www.hydraulicspneumatics.com/technologies/cylinders-actuators/article/21885384/hydraulic-cylinders-keep-their-cool says… “…premature seal degradation can usually be avoided by
specifying a seal material that (is) designed to operate in higher
temperatures. For example, ethylene propylene and Viton seals usually
accommodate temperatures exceeding 350° F.”
Lubrication is a concern! How about high-temperature lubes? https://www.machinerylubrication.com/Read/30674/high-temperature-lubricants says 220 C = 428 F is perhaps the best that we can do! If we can heat-shield a “well” of oil or
grease (lube), and have our otherwise-exposed moving parts dip into there now
and then, we are doing extremely well!
Enclosing the lubricated bearings in heat-shielded areas is even
better. In the worst cases, we’ll have
to make do with un-lubricated parts.
Mechanical or structural cables
aren’t used in the here-described designs, but heat-resistant cables are strong
candidates for use in design variations here.
https://lapplimited.lappgroup.com/products/high-temperature-cable.html provides cables
tolerating up to 1,565 C = 2,849
F, and the lee side max is about 1,832 F, so we could use these, very cautiously,
if we wanted to.
Now
we transition to parts that we can’t or don’t use, that are of less
interest. They’re included here (more or
less) on an “FYI” basis. High-temperature
belts (think V-belts or similar)… https://www.durabelt.com/hightempresistantbelts.php says
“Works up to 230oF (110oC).” Belts are out!
High-temperature
hoses… https://www.ducting.com/high-temperature-hoses
says… “There is one specific
variation of the stainless steel hose that uses a titanium alloy. It can be
used with temperatures up to 1650°
F…” Hoses are HIGHLY questionable,
would have to be used VERY cautiously!
Between
belts and hoses, we can make two very important conclusions:
‘1) ANY use of flexible or pliable
materials for heat-exposed covers or shields, is a VERY bad idea! Hydraulic parts (with support hoses), then,
can’t move around through heat-exposed areas.
In a heat-exposed area, their positions MUST remain fixed, and
heat-shielded!
‘2)
Any ideas about using “heat walls” that use a cooling fluid (like water
or liquid nitrogen), that therefor need cooling-fluid-supplying flexible hoses,
as the heat-wall-protected part moves through heated areas, is off limits as
well. Any such-cooled devices will need
to remain in fixed positions as well.
They will need to be supplied with cooling fluids by insulated
high-temperature (inflexible) metal pipes or ducts.
High-temperature
cloth or fabric used for insulating hoses (or other devices) is off limits as
well. Fiberglass can withstand 1,000 F,
and we need 1,832 F or higher. Asbestos
is ALMOST good enough, at a melting point of 1,600 F (or so), but is also
hazardous as well.
If
you’re really set on trying to use moving, flexible hoses, and insulating them
with fabrics, then see https://nutec.com/products/ceramic-fiber-blanket/ “MAXWOOL CERAMIC FIBER BLANKET”, rated 2,600°F (1425°C). However, notice that the recommended uses
here are as “blankets”, not wrappings on hoses, and so, this fabric might not
be suited for uses involving being flexed a lot. And as you can see, ceramics can sometimes be
turned into flexible fibers. You might,
then, look into the materials used here: https://www.imperial.ac.uk/news/176628/new-record-worlds-most-heat-resistant/ “New record set for world's most heat resistant material”, which says that “Tantalum carbide (TaC) and hafnium carbide (HfC)
are refractory ceramics, meaning they are extraordinarily resistant to heat.
Their ability to withstand extremely harsh environments means that refractory
ceramics could be used in thermal protection systems on high-speed vehicles…”,
and is rated at up to nearly 4,000 C, or 7,232 F!
As
previously mention, we’re primarily interested in hydraulics here. However, electrical generators and motors are
still of some interest. Here, https://netl.doe.gov/node/3754 says (in an
oil-well context) “None of the
commercially available generator systems developed by major service companies
are capable of operation at 250°C. “
Their target (at this web site) is 250 C or 482 F.
Electrical motors self-heat and so they would be even worse. We will have to robustly cool ALL parts of
power management here, in our design context!
Not used here at all,
but of general interest, are thermoelectric device and Peltier “heat pump”
devices. For thermoelectric devices, https://www.energy.gov/sites/prod/files/2014/03/f13/acep_04_elsner.pdf says “Large increases in
thermoelectric conversion efficiency (>3 times) appear feasible from T H’s
of 150°C to 1000°C.”… TH meaning
temp-hot and 1832 F
= 1000 C… This is perhaps the upper
limit of what may happen some sunny day…
Which is the same as our lee side… Probably, this is not of much practical
interest for now.
Now on a Peltier
device, we’d want the cold side in our cooled-down-devices boxes,
and the hot side out in the ambient hot air…
Ambient is best-case 1832 F; can we beat that? A high temperature Peltier device here: https://tetech.com/peltier-thermoelectric-cooler-modules/high-temperature/ says
“Very High Temperature (VT)
modules are rated for intermittent use to temperatures up to 200°C whereas all
other modules we sell are rated for use up to 80°C.” 200°C = 392 F, and so we write this off, except possibly
for uses entirely within the avionics circuits, which is outside of our scope
here.
On
a practical (non-academic, non-developmental) level, Digikey
is an excellent place to see what is available “off the shelf”. For Peltier devices, there, https://www.digikey.com/en/products/filter/thermal-thermoelectric-peltier-modules/222 lists maximum –Th (Temperature-Hot) of 50 C, which is
even worse than above… For practical
“off the shelf” coolers that is.
Moving
on to some other assorted matters, “hydraulic batteries” are of much interest
here. See https://www.hydraulicspneumatics.com/technologies/accumulators/article/21882959/hydraulic-batteries-save-fuel “Hydraulic ‘Batteries’ Save Fuel”. From there, “Hydropneumatic accumulators are widely used in
hydraulic systems because they provide auxiliary power during peak periods.
This lets designers select smaller pumps, motors, and reservoirs in the main
system.” We’ll refer to this again.
Of general interest
are the following: https://scholarworks.iupui.edu/bitstream/handle/1805/7396/Vaezi_2014_energy.pdf;jsessionid=B7BC2AB03D619A47177D51FF43D852BF?sequence=1 is “Energy Storage Techniques for Hydraulic Wind Power
Systems”. Also see https://www.sandia.gov/ess-ssl/EESAT/2005_papers/Lemofouet.pdf “Principle of
Hybrid Energy Storage Systems Based on Hydro-Pneumatics and Supercapacitors for
Distributed Generation and Renewable Energy Sources Support”. Then https://www.mobilehydraulictips.com/energy-efficient-hydro-accumulators-for-energy-storage-or-conversion/ is a
commercial. At my casual glance, it
seems to involve mostly dampeners to dampen out hydraulic pressure
oscillations.
Let
me briefly add that hydraulic accumulators need not be heavy and thick-walled,
which we wouldn’t want for aerospace applications. The can have COPV (Composite Overwrapped
Pressure Vessel)-style lightweight yet strong walls. For samples of providers of
aerospace-type accumulators, https://ph.parker.com/us/en/aerospace-accumulators and https://www.valcor.com/missiles-and-aerospace/aerospace-accumulators/.
Also
of general interest for actuators, see https://en.wikipedia.org/wiki/Worm_drive for possible use
(not used here). A linear actuator may also
be of interest: See https://en.wikipedia.org/wiki/Linear_actuator for
actuators. A sub-type being a “screw
actuator” is what we may sometimes want, along with a hydraulic motor.
OK,
now I think that it’s high time to move on!
Building a “Heat Wall” (or Ice-Box) for
Subassemblies
High-temperature shielding tiles are well enough known
from the Space Shuttle days, and now from Space X’s “Starship”. These are easily enough researched, and I
have no special comments to add here, about those. Under the tiles, one can locate a
blanket. Search here in this document
for “Maxwool” search-string for a good candidate
material. One or both of these could be
on the outer layers of a “heat wall” for components that need to be kept
cool. This is also true for
fluid-carrying pipes (don’t forget, fixed locations, not moving hoses!) that
carry hydraulic fluids, or water, or liquid or gaseous nitrogen, for
cooling. Liquid nitrogen (or helium or
other inert coolant) may gasify during its journey, but that will be OK, as
long as it is kept as cold as possible.
Now please see a document that is kept at duplicated
locations at https://www.researchgate.net/publication/331556573_Designs_for_Passively_Thermally_Gated_Fluid_Flow_Switches and at http://www.rocketslinger.com/Psv_Tgt_Fsw/, titled
“Designs
for Passively, Thermally Gated Fluid Flow Switches”. This was written when Space X was still
considering the use of “transpiration cooling” for “Starship”. So it is written assuming that the cooling
gas (liquid nitrogen being an excellent choice) would be kept in a “sandwich
layer” between two metal outer rocket-walls, and that tiny simple weep holes
and-or passively thermally gated switches would allow cooling fluids to flow
OUTWARDS, through the outer skin of the rocket body. Here, for this application, we could let the
cooling fluids weep INWARDS, into the “ice boxes” that keep our most sensitive
gear (some of which self-heat when used) cold.
Passive, simple, tiny weep holes, thermally gated passive switches, and
active electrically gated, temperature-sensors-equipped fluid switches could be
used, any one alone, or in any desired mix.
In the below drawing, let’s just label them all as “pores”. The coolant flows to the “ice-box”, and is
injected (or flows) inwards as is needed.
At some “quiet spot” where there’s not much external airflow (ambient air
flows undesirably, excessively pulling out our cooling gasses via the “chimney
effect”), we place a small outlet hole to allow cooling-gasses outflows to
ambient pressure, preventing our “ice-box” from becoming a balloon, and blowing
up!
See the below drawing of an “ice-box”, and keep in mind
that this is the “deluxe” version. Not
all ice-boxes will need all of the layers shown.
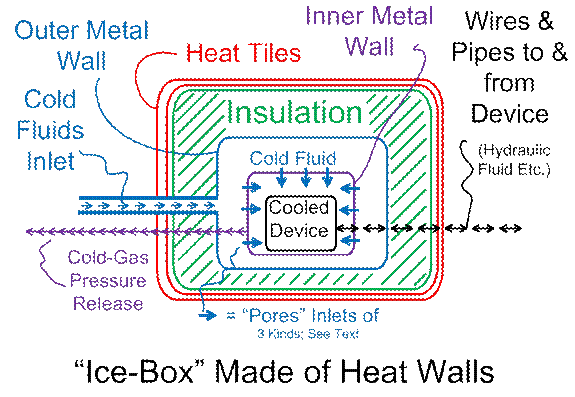
Figure
#1
A
good-quality “ice-box” will be needed for all devices that are located in hot ambient
air, in the (during ascent, fairings-enclosed) payload bay, during descent
(after the “flower petals open” and the payload is deployed, and the de-orbit
burn is performed). For many devices, we
will have no sensible choices, other than to deploy them there, in the
otherwise-now-emptied payload bay.
However, let’s
assume we’ll want to keep things modular.
The payload bay will often contain a satellite (more often satellites
plural) that need clean-room conditions, unlike the rocket itself. The payload bay will be positively
pressurized with clean air, on the way up.
This isn’t true of the inside of the rocket body, where ambient air
pressure (outside of fuel and oxidizer tanks of course) is acceptable. So there will be a payload bay “floor” (that
needs to be airtight) and a rocket-body “roof” (not airtight), both of which
will need to be bolted (or otherwise fastened) together. We could call this a “deck” of the payload
bay.
We can leave voids
(holes) or indentations (pockets) in the roof of the rocket body. Now we can put SOME of our heat-sensitive
components “below the deck” instead of “above the deck”. Below deck, using the shelter of a colder,
LARGE rocket body (a large heat sink), we can use less-bulky and less-expensive
“heat walls” to shelter some of our heat-sensitive components. These might include avionics, batteries,
hydraulic-fluid tanks, hydraulic accumulators, liquid nitrogen tanks, and
(perhaps) a hydraulic motor driving an electrical generator, to keep our electrical
batteries topped off.
To keep things
modular and not too messy, we’ll want to keep the connections and
disconnections between the rocket body and the payload compartment
minimized. Since many components MUST be
above deck, that means we’ll want to cluster most of the associated parts
together, associated with the payload bay.
On the other hand, that makes the payload bay (which must move from a
clean room where the payload is assembled) heavier (harder to move). For that reason, heavy (and dirty?) items
might want to stay with the rocket body.
Some balance (of conflicting objectives) must be struck here.
Fleshing Out the Details of the “Powered Hinge”
The parent document mentions a
“powered hinge”, but never describes it in detail. The time is now to describe a good design for
such a device, in this application. The
“powered hinge” opens the “petals” of the bud (closed payload bay) to become
petals instead of fairings-segments.
Petals later become “grid fins” as sacrificial materials fall, burn, or
ablate away.
Many
of us are familiar with “gas shocks” for partially lifting or counter-balancing
a (vertically opening) heavy door, or for softening the opening and closing of
many kinds of doors. A “gas shock”
(pneumatic cylinder) here is highly similar to a hydraulic cylinder. Envision it spanning from the payload bay
“floor” (deck) towards a central strong spar on the “petal”, in a right
triangle (in a petal-closed condition), with a triangle side on the petal, and
a triangle side on the “deck”. The
hypotenuse is the hydraulic cylinder. At
way-wide-opened positions, the door-opening force exerted is WAY
sub-optimal! Far worse, the hydraulic
cylinder would sweep through different positions for us, and we can’t use hoses
(hydraulic or otherwise), or flexible “heat walls”, here. I won’t bother to provide a special drawing
here (unless asked, at RocketSlinger@SBCGlobal.net), so here are
some illustrations of such a device: Amazon Lifter.
So
a good solution that I could devise, is to add (rigidly, with no deliberately
added ability to flex) an almost-1/4th of a circle (an arc, like a
pie crust on a pie slice) of a strong heat-resistant metal, firmly bonded to
the central, strong structural spar on a petal.
The arc can be called a “pusher arc”.
It will need to VERY strongly push on the petals, during descent,
against prevailing winds. If the “pusher
arc” is ever “asked to” pull, instead, it will be only very weakly pulling
inwards. The “pusher arc” will be cogged
on both sides, phased cog-to-cog at 180 degrees from
one side to another, so that hydraulic-motor-driven cog wheels (qty 2) can grip it firmly at all times. From a side profile, it will look like this:
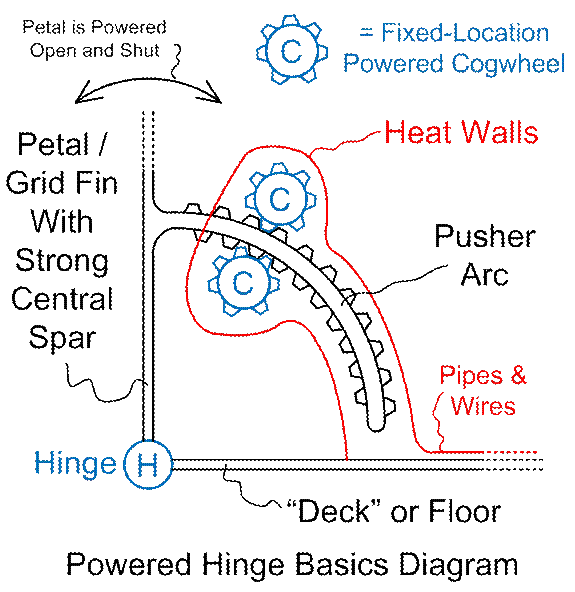
Figure
#2
The
metallic pusher arc will need to be built large and strong, to handle all of
the forces involved. The
petals-becoming-grid-fins will try to twist, flutter, shake, and bend. More on that later.
The
heat wall encloses a curved metal sheath (a slot; think of a scabbard). The scabbard can dispense lubrication
(grease) onto the heat-walled cogwheels and (cogged) pusher arc. When the pusher arc becomes exposed to hot
ambient air (as it must, when extended), the grease will burn or be blown away,
to be replenished when it re-enters the “scabbard”.
The
cog wheels (driven by hydraulic motors) MUST be VERY firmly held into place, to
handle the tremendous forces involved!
Structurally, they can be held up on a strong “post”, reinforced by
“braces”. These structures may or may
not be encased by heat walls (or partially enclosed), as is convenient. The below drawing should clarify and
emphasize this point. Note that these
drawings can become quite cluttered, so they will sometimes be repeated, adding
and subtracting different elements.
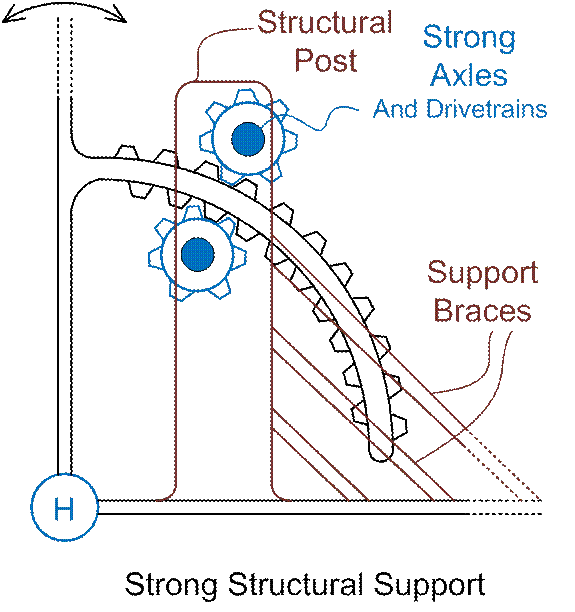
Figure
#3
The
floor here (and the roof of the rocket body, together perhaps best called the
“deck”) will need to be built stronger than it would otherwise have to be, with
all of the forces exerted by the petals-becoming-grid-fins. The petals will act like a manual, simple can
opener with a prying handle (not the kind that you turn). We don’t want to “open our can”, here, we
want to recycle it without excessive damage!
Another way to think about it is to compare the “deck” here with what
Space X calls their “thrust puck”. We’ll
likewise need to “beef up” this structure at the top lip of the “can” of the
rocket body, similar to a “thrust puck”.
But this is outside of our scope to say more. I have no detailed mechanical or structural expertise
here!
Another
thing that can be done is to double up the pusher arcs. Think of another one behind the one shown, in
the above drawings. One can be located
at each end of the hinges. If the hinges
are long enough, perhaps we can line up 3 or 4 of these structures (pusher
arcs, scabbards, etc.) on each hinge. If
we do so, adjustments will need to be made on the petals. A strong central spar becomes 2 or more such
spars, perhaps with holes in the grid fins in between multiple spars. We don’t want to go “solid planar” out there,
or we’ll collect too much force!
Then
yet another thing that we can do to “beef up” the powered hinge is to nest
larger and smaller pusher arcs together.
Below, the arrangement is shown, conceptually, with the cogs stripped
off of the pusher arcs, and the cogwheels not show, to simplify, and to make
room.
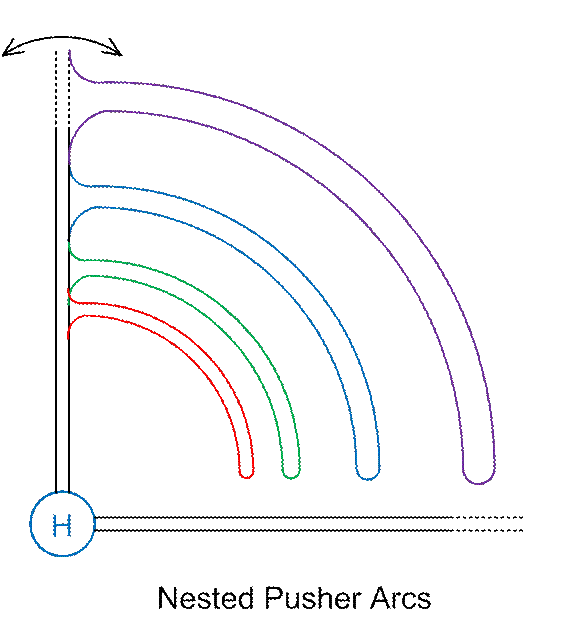
Figure
#4
The
above could have 4 separate “scabbards” for the 4 separate pusher arcs. Or, we could go further yet, and smear all 4
arcs into a single solid plate (like a pie shape with the innermost tip nibbled
off), and place arcs of tracks of holes in the plate, for cogwheels to run
through these tracks (cog wheels rotate 90 degrees from what is shown in above
drawings). Now we would have just one
scabbard, not 4, of course.
In
Norse mythology, the “Bifrost Bridge” is a rainbow bridge between otherworldly
realms. Our “otherworldly realms” being
bridged by our rainbow bridge here are space, the exosphere, thermosphere,
mesosphere, etc., so, for several reasons, we will call this entire design of a
powered hinge (with variations) the “Bifrost Hinge” (please don’t think of me
as being unhinged, for that).
Now
I have yet another idea that I consider worthy of describing, in terms of the
“Bifrost Hinge”, then. My mechanical
intuition tells me that this is one of the best versions, actually, for
whatever it is worth. Picture in your
mind’s eye, each of these cogged-on-both-edges pusher-arcs being replaced by
TWO solid arc-plates, with rungs (like ladder-rungs) placed between the two
(identically sized and shaped) pusher-arcs.
This should be easier to manufacture than the cogged-on-both-edges
pusher-arcs. The cogwheels then grab the
“ladder” rungs (be sure to phase the cogs-pushing in an interleaved pattern,
from one cogwheel to the next, for evenly modulated force). It is NOT mandatory to place the cogwheels on
both sides of the “ladder”. If the
outermost edges of the ladder-sides are VERY firmly supported and lubricated by
the “scabbard”, then all cogwheels could reside on the inner edge. The above-described solid “pusher plate” with
tracks of holes, option, is OUT, for this design variation, because such a
plate resides where the cogwheels want to go, here, and in the exact same
plane. Other options (nested rainbow
style and one behind the other, on the same hinge) do remain viable, for the
“ladder” approach.
An
illustration is easy enough to provide, so here it is:
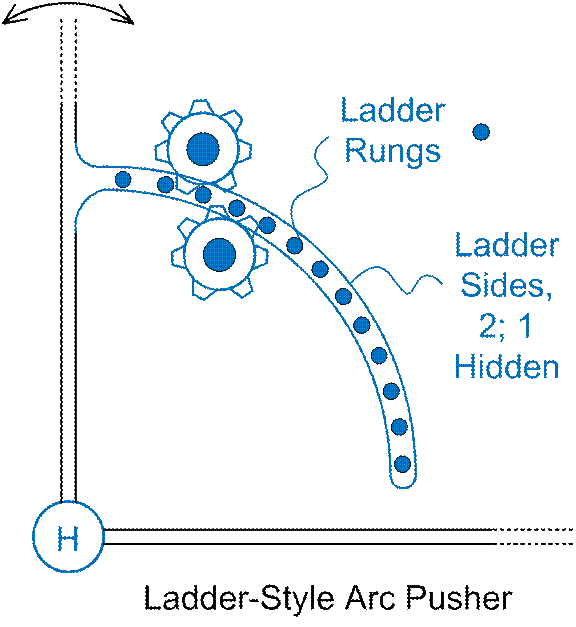
Figure
#5
There’s
one more mechanical aspect of “Bifrost Hinges” that I’d like to discus, but
first, let’s briefly detour, and then return.
You’ll see why (assuming you’re a linear reader) in a moment.
Operational (Flight) Modes
The “flower bud” will remain tightly closed, enclosing
clean, pressurized air (for most applications) surrounding the payload, all of
the way up to orbit. The “petals” will
then open fully, to get well out of the way for payload deployment. Petal-opening forces there will be
minimal. There may be several stages of
payload (satellite) deployments, sometimes even with
orbital-adjustment burns in between. If
the user desires this, one could close the flower buds back up for intermediate
journeys between different orbits. If
nothing else, closing the “bud” back up would protect the payload from being
impacted by orbiting trash, during these journeys. Opening and closing the petals will require
minimal forces in a vacuum.
Next,
the de-orbit burn is performed. I’m
assuming that we’d leave the flower fully opened up for this, or open it back
up immediately after the burn. Now, in
the outermost, thinnest whispers of air, we can kill a maximum magnitude of
speed, spreading out the heat and speed-wasting efforts, in the “calm before
the storm”. More slight stress now means
less peak stress later. So fully opening
up the petals during this time would be best.
But stresses on the petal-spars and Bifrost hinges will remain minimal,
during this time.
As the heat-storm
builds up, the forces will amplify on the petals. The petals will degrade into grid fins. During this time, the
petals-becoming-grid-fins should retract more and more, and not be allowed to
be subjected to dangerously excessive forces. Imbalanced forces from one petal to another
(as some degrade into grid fins faster than others) can be corrected for, by
deploying the most-degraded (less force-gathering) grid fins out further than
those who are less degraded. Measuring
the tilt of the vehicle may be “good enough” to inform the decisions of the
avionics package, with regard to this.
One might wish to equip the support structures internal to the Bifrost
hinge system with “strain gauges”, and hydraulic pressures within the hydraulic
circuits, to help inform the avionics control circuits, is an added
parenthetical thought, though. During
this time, there will be tremendous forces pushing IN on the arc-pushers,
making them hard to push OUT, but ridiculously easy to pull IN.
At some time towards
the end of the process of petals degrading into grid fins, or shortly
thereafter, we should enter a slow “rotisserie roll” mode (to spread the heat
on the rocket body), which is caused by a slow process of rolling around the
rim of the deck, a pattern of the grid fins being deployed in an imbalanced
fashion. The rotisserie roll will be
accompanied by a corkscrew descent pattern for the entire vehicle. Once again, the grid fins may not be deployed
very far outwards, and the Bifrost hinges will be hard to push out, but easy to
retract. For more details about the
rotisserie roll, and a drawing, see the parent document. Figure #3 there is of interest.
Now, during this
(rotisserie roll) mode, will the grid fins ever be deployed to their maximum
reach? It’s hard to tell… How much mass are we willing to spend to make
the grid-fins and grid-fins spars, the Bifrost hinges and supports, and the
payload deck strong? How much of the
grid fins will be planar (as in the spars for interfacing to the Bifrost
hinge’s pusher arcs), v/s how perforated will the grid fins be? There are many variables at play here.
Once
we’ve reduced our speed (to sub-sonic levels) in the lower (much thicker)
atmosphere, where we might want to deploy parachutes, the forces on the grid
fins will be much reduced. Here, for
maximum added “parachute effect” of the grid fins, they’d best be deployed to
their maximum possible reach. But forces
at this stage, on the grid fins, will be minimal. If parachute fabric can survive here, grid
fins (and their supports) will survive with colors flying!
Back to the Bifrost Hinges Designs
So the most critical remaining open question from above
is, during “rotisserie roll” mode, will we, or will we not, want to maximally
extend our pusher arcs outwards, in any maximal-stress mode? (I think this is the only time we’d maximally
extend them in a high-stress mode, but I could be wrong). ***IF*** we NEVER extend maximally, in a
high-stress mode, then a question arises, which is, “Can we attain any safe
mass reductions in our Bifrost hinges design, at the maximal reaches of the
highest degrees of extension”?
We can’t play games with the strength of the deck, or of the
post or braces that fix (in space) the hydraulic motors and cogwheels
(“drivetrain”), or the true hinge, or the drivetrain itself, or the spars on
the petals-becoming-grid-fins. All that
is left is pusher-arc itself. There, if
our conditions are met, we can weaken the points on the pusher-arcs, at the
points furthest-removed from where these arcs meet the petals. This assumes that pushing hydraulic motors
and cogwheels are clustered at the ends of the pusher-arcs which are closest to
the petals (grid fins), as they should be.
There, at the far-removed tips of the pusher-arcs, we can add voids
(holes), or internal inclusions of lower-density (weaker) metals, or other
materials. It’s not much, but there it
is! We can weaken the remote tips of the
pusher-arcs, if the design (and operational) parameters allow. Mass reductions are precious here, in ANY
space-travel context! Enough said.
Now,
all of that being said, let’s describe one more variation (or set of
variations) on the Bifrost Hinge. This
is another top contender, and perhaps even the best of them all.
We
have already briefly discussed a variation of what is shown above, in Figure
#4, where the multiple pusher-arcs can be smeared together, and tracks of holes
can be placed into the smeared-together plate (in the shape of a truncated
pie-slice). Cogwheels could push on
these arc-shaped tracks of holes.
Let’s
take this in a different direction.
Place no holes in the truncated-pie-slice-shaped plate, and turn it into
a dry friction plate. This means that we
don’t intend to lubricate it. The dry
friction plate mates to a strong spar on the petal, of course. On both sides of the friction plate, there
are truncated-funnel shapes, which strongly squeeze the friction plate
together. The truncated funnel shapes
have multiple grooves cut into the ODs (Outer Diameters) where V-belts can
couple to multiple hydraulic motors. The
V-belt grooves are cut deep enough, so that the V-belts don’t touch the
friction plate. Parenthetically, V-belts
could here be replaced by chains, with cogs on the funnels. I prefer the idea of using V-belts, because
the funnels are easier to manufacture, and there’s no cogs to be broken off. V-belts would need to be strong and durable,
and inspected (or replaced) between uses.
A torn V-belt caught up between a funnel and the friction plate could
easily (and quickly) spell disaster!
In
either case, the funnels are free to spin on bearings at the small-tip area of
the funnel (which has been truncated), and at or near the open end of the
funnel as well. Probably best, a spin
axis (axle) would run clear through the entire funnel, and would be
lubricated. All of this (the entire
drivetrain and support structures) would need to be ruggedly built. Possibly, some areas (of the funnel) could
include voids (or inclusions of less-dense, weaker metals or other materials),
AKA be “honeycombed”, for saving mass.
The
funnels, motors, and V-belts can all be heat-walled, with only one significant
area of heat exposure, and that’s where the (much-squeezed) friction plate
travels in and out of the slot between the two rolling funnels. Advantages here, then, are that no
lubrication is exposed to high temperatures, and that we allow “slippage”. If there are sudden jolts (“peak loads”) of
high forces imparted to the petals (grid fins) and their spars and the friction
plates, we’ll not get broken cogs… We’ll
instead get slippage between the friction plate and the funnels, and possibly also
between the funnels and the V-Belts.
The
above is an introductory summary of where we’re going here, and why. Keep in mind that the linear distance
travelled on the surface of the funnel (for a given degree of rotation) is much
greater at the OD (Outer Diameter) than the ID.
We want to optimally lay out a “grip line” where the friction plate
meets the 2 “squeezer funnels”, and the linear speed rates of all elements
agree with each other, all along the “grip line”. Else our design elements conflict with one
another, and we get “binding” instead of relatively free motions.
Now
before we start in on some drawings, it might be best to look at some basics of
the design here. I like to go intuitive
and experimental on these things, with a smattering of theory. The truncated pie-slice friction plate here,
if we ignore the thickness of it, can be modelled by a piece of paper, or the
walls of a cardboard box. Get yourself a
funnel, where the funnel walls come together at 90 degrees at the tip of the
funnel (if you can find one, go “close enough” and imagine it being 90 degrees,
or play with some paper and scissors, maybe even some tape too). Imagine the friction plate being “rolled out”
by your funnel. Or place paint all
around the outer surfaces of at least half of a funnel, and roll it on a piece
of paper, with the tip of the funnel held in one spot. The paint laid out on the paper will look
like our “friction plate”. A ½ (180 degrees)
of a roll of the funnel is needed to “lay out” the 1/4th of a circle
that is “laid down” in our 1/4th slice of pie, that represents the
friction plate. As we imagine the
spinning funnel on the far side of the friction plate, we also see that the
“grip line” MUST reside (no choice here) at 45 degrees, halfway between the
petal wall and the deck. This assumes we
put the funnel in “square” with the petal and deck. We can make SOME adjustments to that, as
we’ll see further below.
The
whole scheme here can be envisioned as a sphere, with the center of the sphere
being in the middle of the center of the true hinge (where petal meets
deck). The two squeezer funnels are
tapered, cylindrical cones, whose tips “want to” reside at the exact center of
our sphere, if we want precise agreement along the length of the “grip line”. The friction plate (ignoring thickness) can be
envisioned as being “laid out” by the same kind of rolling cylindrical cone
(right angles of the sides, don’t forget) as we’ve described.
It
is NOT a good idea to have the “grip line” between the two rolling funnels meet
at any kind of offset (of center of rotation) from the center of rotation of
the friction plate, whose center of rotation MUST reside in the middle of the
hinge! “Geometry testing by drawing
software” (Visio in this case, in the below drawing) should prove this
point. “H” is the hinge (the true
standard) and H1, H2, and H3 are sample alternate
centers of rotation, for the funnels, whose “grip lines” shift with them. “Grip lines mismatched” means troubles, of
course! This means cheating is
dangerous! The centers of rotations for
the funnels need to be at the center of the hinge, and, if offset, offset VERY
little! The point of the below drawing
might be a little bit subtle, but a moment or two of consideration should help
to clarify matters.
More
descriptions of this: We are building a
“slip clutch” or “torque limiter”. The
two spinning-top-style funnels can squeeze the friction plate very hard, and
still remain fairly free to spin, while gripping (and moving) the plate firmly. This is true IF the above rules are followed,
and IF the funnels have 90-degree tips. (This
last part is true because the friction plate meets the petal at 90
degrees). Otherwise, due to mismatched
“grip lines”, your device will bind badly!
It’s
probably high time for more drawings.

Figure #6
The
below drawing (of a funnel) assumes that we use V-belts. We’ll assign this idea as being less than
optimal shortly, but here, let’s cover it anyway.
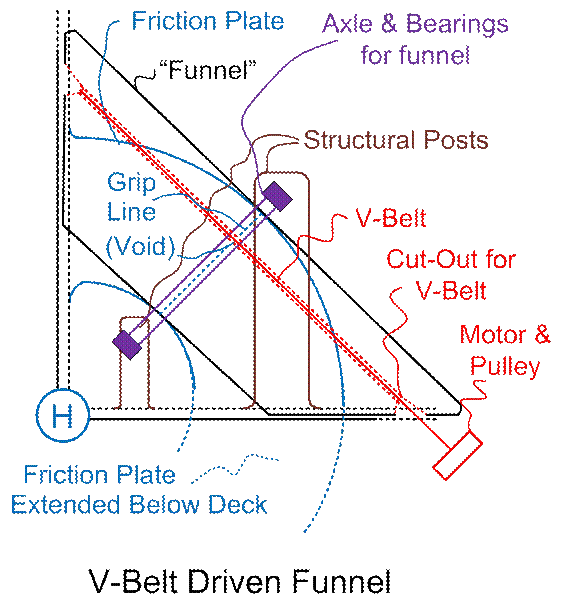
Figure #7
Several
things quickly become apparent. The
funnel bangs into our petal, and the deck!
Both petal and deck can be “bulged” or moved out of the way. We can’t put holes into the petal (which
needs to stay airtight on the way up), but we can put airtight pockets into the
deck, for the funnels. For the friction
plate, we can put pockets (“scabbards”), or, perhaps rubbery plastic air-seals
(gaskets) attached to the slot-lips to seal the minimal clearance-spaces
between the deck-slot and the friction plate.
These gaskets would be free to burn or abrade away later, during
descent. If we want to push the petals
out more than 45 degrees, we’ll have to grow the friction plate below deck,
with a slot cut into the deck. I’m not
sure how far the petals would have to be extended, to balance out their
usefulness v/s the costs of growing the friction plates. This is beyond my expertise! PS, note, the axle (along with the entire
funnel) will tilt towards the viewer at the tops of the axle and funnel. The drawing is busy enough, without trying to
show that.
More
than one set of V-belts could be used (I showed only one, to cut clutter). The “grip” of the V-belts on the funnels
would be good and long, and gently curved, for low wear and tear on the
V-belts. However, one would have to find
room to squeeze a motor and pulley (per each V-belt) in there as well. If they are kept small, we can find some room
(between the funnel and the deck, away from the friction plate, and away from
where the deck will have to be bulged down to make room for the lowest parts of
the funnel). Any other space, especially
if we want a large pulley, eats up valuable room. And a small pulley sharply bends the V-belt,
causing rapid wear. Parenthetically, to
envision all this in 3D, it helps to place 2 funnels in 2 cardboard boxes, with
the boxes wall-to-wall, and the tips of the funnels close together, in the
bottom corners of the 2 boxes. The walls between the 2 boxes is the friction plate.
Probably
yet worse, to protect the V-belts from the heat, we’ll have to shield (“heat
wall”) most of the funnel (except we can’t do that where the funnel touches the
friction plate, of course). That means
we eat up more space, and have to “invade” the petal and the deck some more. Note that we ARE free to rotate the funnel
clockwise a tad if we want to (in the above views), to avoid bulging the petal
as much, but that, of course, invades the deck yet that much more. Also note, the cut-outs for the V-belts
(grooves in the funnels) will segment (void parts of) our grip line, reducing
the grip of our slip-clutch. So it’s
probably best to totally drop the ideas about using V-belts.
Now
why did I like V-belts in the first place?
For “defense in depth” against “peak loading” on the
slip-clutch function here.
V-belts can slip, without breaking cogs.
But if we think about it, looking at figures 2-3-4-5, the slip-clutches
could be embedded into the couplings between hydraulic motors, and the driving
cogwheels. The driving cogwheels will
still have inertia, so EXTREME (and sudden) peak loads could still break cogs
(the slip-clutch function is further removed from the true hinge, with the use
of driving cogwheels). All in all,
though… V-belts have too many
disadvantages!
More
minor parenthetical notes: The bearings
at both ends of the axle through the funnel will need to be lubricated, so
therefore, heat-shielded as well (regardless of V-belts v/s cogwheels being
used). The bearings stay in fixed
locations, so we are fine (I just don’t show the obvious things in the
drawings, to reduce clutter). Also, I
make no comments here as to dimensions or to scale, in a lot of cases. How large will the “Bifrost Hinges” system need to be, with respect to the sizes of the petals,
and the entire deck? I don’t know! I don’t have the expertise required, here, to
hazard a good guess, even. “Not tiny” is
clear, though, because they will need to be STRONG!
Also
note, the above drawing over-simplifies structural supports, above and beyond
not showing braces. The shorter post
close to the true hinge can be just one post.
The taller post should be 3 or 4 posts, since the support as shown, if
duplicated on the side where the funnel meets the friction plate at the “grip
line”, should be moved to become two posts, straddling the grip line, with an
overhead structure to mount the bearing.
Alternately, the axle can be longer, and the post further away from the
petal (and longer as well). I think that
2 shorter posts is best. For symmetry and overall compactness, we
might want to do the same thing on the near side (close to the viewer). Re-stated, the drawing overlaps the far-side
post (hiding behind the front post) and the grip line a bit, which is clearly
not possible. Almost the entire
oversimplified “support structure” drawing above is a “glib fib”, because the
funnel is tilted more complexly, in 3D, than what is shown. We need firm supports, that
fit correctly, and aren’t excessively massive, is really about “enough said”,
I think.
If
we combine the funnel with cogwheels, we could do something like the below:
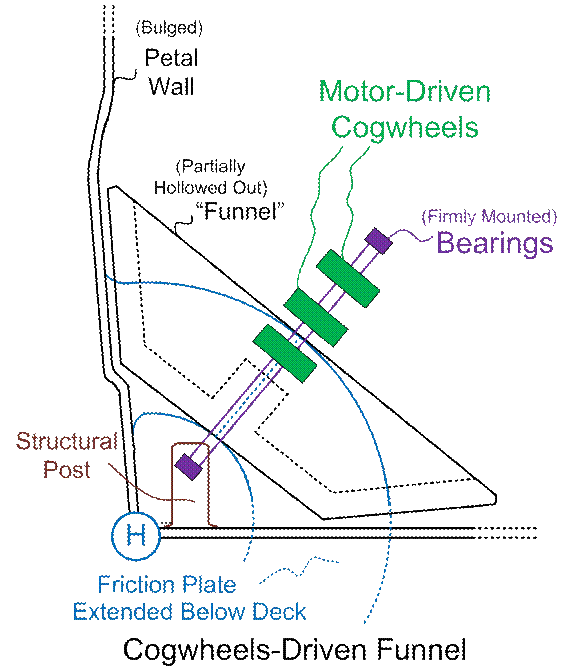
Figure #8
The
number of cogwheels could be 1 or more…
And the bulges for accommodating the funnels can be placed into the
petals or the deck, or both. I show
(above) budging the petals out of the way.
Upon thinking about it some more, bulging the
deck is probably far better. Why? Because tilting the funnels (towards the
petals) and where the friction plate becomes squeezed between them may invite
FOD (Foreign Object Damage), since materials from the petal (as it degrades in
high winds) may get caught in there.
Tilting the funnels away from the petals reduces this risk.
Tilting
the funnels towards the deck, instead, means that we have to invade the rocket
body some more, to extend the friction plate, while still retaining our ability
to maximally extend our petals. In
comments immediately below Figure #7, we discussed adding rubbery gaskets to
air-seal the narrow gaps between the frictions plates and slots in the
deck. This approach, too, would risk the
gaskets (as they degrade) creating FOD between the funnels and the friction
plate. So we might as well sheath (think
“scabbards”) the entire potential travel distances of the friction plates,
keeping an air seal. The furthest-away-from-the-petals
points of the scabbards can meet (or be braced against) the rocket body wall,
below deck. This helps build structural
strength. Search for a “can opener” search-string
further above in this document, to see comments about structural strength
here. In summary, to prevent FOD and to
maintain structural strength, the friction plates should best be sheathed (not
gaskets-in-slots-sealed), the funnels should be tilted into bulges in the deck,
and the sheaths (“scabbards”) should be buttressed against (or otherwise merged
into) the walls of the rocket body. Rocket-body
designers will have to accommodate this invasion, in the name of recycling most
of our uppermost stage, if this version of the Bifrost hinge is used.
Also note that
(not clearly shown) where the friction plate meets the petal wall, there’s
plenty of room between the funnels, for putting a “V” shaped structural element
thickening the friction plate (bottom, sharp point of the “V” shape pointing
towards the grip line), for strengthening the joint where the petal meets the
friction plate. This is where a strong
structural spar resides in the middle of the petal-becomes-a-grid-fin. We’d have to look “downwards” onto the
friction plate (edge-on, onto the friction plate), between 2 funnels, to show
that. Ask for more drawings, if needed,
at RocketSlinger@SBCGlobal.net. Small parenthetical note: Placing more than one SET of funnels (plus
one friction plate per set) on one true hinge seems to me to be a crazy idea,
unless the funnels (etc.) are very small, or the hinge is very long. I wouldn’t recommend the idea. Other than that, I think that the “Bifrost
Hinge”, in many variations, has now been thoroughly described.
Routing Airflow to an Energy-Harvesting Device
or Devices
As we’ll see later (further below), I believe that a
river-boat-style “paddle wheel” energy-harvesting device will be most sensible
for our uses here. So a crude drawing of
such a wheel is shown in the drawings below.
The parent document mentions the idea
of placing the energy-harvesting devices on twin rails or a grid-fins-style
perforated plate, to thrust the harvesting devices “out into the breezes” after
payload deployment. Due to lack of
high-temperature lubricants (thus making transfer of mechanical energy via
roller chains be not such a good idea), and high-temperature hydraulic pumps,
hoses, and fluids likewise off bounds, the entire idea of mobile-location
energy-harvesting devices should be written off. And trying to embed the harvesting devices
into the petal walls (with good air seals) is similarly complex and therefore off
limits.
I
have grown wiser now! As
was apparently retold by Francis Bacon, “If the mountain will not come to Muhammad,
then Muhammad must go to the mountain”. If we can’t move our energy-harvesting
devices into the airstreams, then we must bring our airstreams to the (fixed
locations) energy-harvesting devices.
Where one petal meets another (where they are latched together by
electromechanical latches during ascent), we place bulges in the petals. These bulges will turn our entire design into
a yet more-so “partial hammerhead” design, but it is worth the price. I envision only 2 (not 4) of these bulges, to
preserve symmetry, while keeping complexity down to a dull roar. Below, we repeat elements of Figure #4 from
the parent document to show what I
mean.
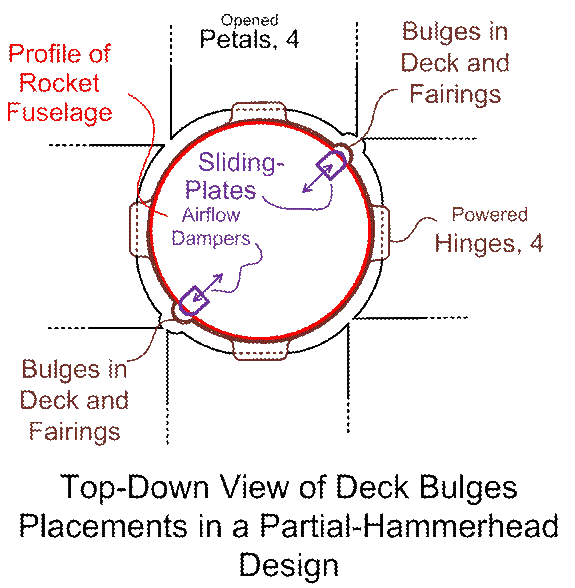
Figure #9
The
purple-colored sliding airflow-damper plates (above) should be located in line
with, or slightly above or below the deck.
When closed (shutting off all airflow), they might mate directly to
slots in the bottoms of the petals, where the petals bulge out, there. I can see no reason why we can’t do it that
way. If, however, we have to leave an
arc (half-circle) of structural material out there, for some reason, after the
petals open, that might work as well. If
these structural arcs get blown away during descent, that might be acceptable
as well.
The
sliding plates can be driven by hydraulic cylinders, with the cylinder bodies
themselves heat-shielded, and the long skinny metal rods left exposed to the
heat. Hydraulic cylinders are fairly
simple, which is why I favor their use here.
Another alternate choice is a “screw actuator” type of linear actuator, driven
by a hydraulic motor. Close the damper
until after the payload is ready to deploy.
Afterwards, withdraw the damper to allow airflow (unobstructed by the
rocket body) to power one edge of an energy-harvester (I favor a paddle-wheel
design). The sliding damper can double
up to adjust how much or how little airflow is fed to the energy-harvester,
which should be located right above the damper.

Figure #10
The
wind-collecting sides of the paddle wheels are now exposed to high winds (and
high pressure), while the sheltered sides are not. The wheel axles (and the hydraulic pumps that
go with them) are now also fairly well sheltered from the wind and heat, while
staying in a fixed location. That’s what
this whole scheme is about!
I
don’t know how much or how little wind we want to collect. The above shows no “air ram-scoops” tacked
onto the flanks of the rocket body. We
could put amplifying scoops or reducing scoops there as may be needed. The below drawing is easy enough to provide,
so here it is:
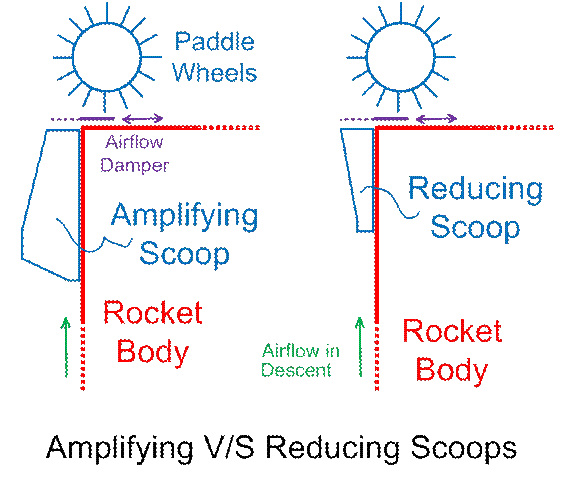
Figure #11
The
reducing scoop may not make sense if one regards it as being redundant with the
airflow-reducing function of choking off the damper a bit. However, if the adjustable damper is delicate
compared to the strength of the wind, a strongly-built reducing scoop may make
more sense than beefing up the adjustable damper.
It
is entirely possible, too, that we could put air-scoops down on the flanks of
the rocket body, and invade the body of the rocket with angled air-pipes, and
bring the airflow fountains (geysers?) up into the deck, further away from the
edges of the deck. We’d still need our
sliding dampers to choke off airflow during ascent, to keep our clean air
(around the payload) protected. This method
would eliminate our need to put special bulges in the petals (fairings), at the
twin expenses of making the rocket body more complex, and of impeding
straight-line airflow. This idea seems
simple enough to me, that I provide no drawing.
Another
idea is to put one single straight-line air-pipe right up the centerline of the
rocket body (in the middle of the rocket engines and everything). Fuel and oxidizer tanks might turn into toroids or “donut shapes” to accommodate this pipe. Now we could have just one “air fountain” in
the middle of the deck. I doubt that
rocket-body designers would be too happy to make all of the changes required (I
could be wrong). Once again, this idea
is simple enough, to skip the drawing.
Energy-Harvesting Devices
I favor the paddle-wheel, for its simplicity. I don’t think I need to elaborate on that
much at all. If, as described above, one
side of the wheel is in the high winds, and the other side (as well as the axle
and hydraulic pump) is sheltered (and heat-walled), it should work just fine.
The other is a wind chainsaw, or chain windmill. See the abstract way up above for a quick
summary. See https://en.wikipedia.org/wiki/Bicycle_chain to understand the
terms used to describe the parts of a “roller chain”. Here, for a chain
windmill, we could just add (to the “outer plates” in the chain) rigid wind-catching
wind-vanes, similar to the vanes or paddles on a paddle wheel. We’d need them, not on each and every outer
plate of the chain, but, say, on every 5th or 6th or 7th
one, or some such.
If one side of the chain is in the stiff breeze (two
cogged wheels carry the chain, with the wheels being of a sufficiently large
diameter), and the other side is sheltered, we are doing fine… Except now, we have TWO wheels that need
lubricated, and their axles protected from heat, AND we have NO reliable method
of keeping the chain itself lubricated.
This is extra trouble and complexity, for no good reason, compared to
the paddle wheel, in my opinion.
However, I did have 2 ideas that might be useful for a “chain
windmill” in some other context, so I’ll briefly describe them “just for
grins”. ***IF*** we did NOT have a clear
difference between a stiff breeze on one side, and shelter on the other (and we
could ideally also lubricate the chain, of course), then “folding the vanes out
of the way” on the chain’s return journey would make sense. Here is what that would look like, in
incarnation #1:
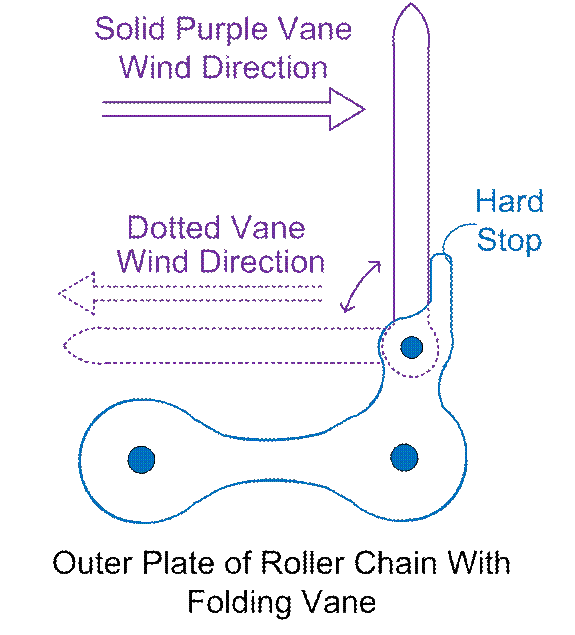
Figure #12
The
hardstop angle could be adjusted if the angle of the
wind chainsaw (to the wind) is desired to be oblique rather than 90
degrees. The hardstop
and the vane should span from one outer plate to the other, on both sides of
the roller chain. Other than that, the
drawing should make the idea fairly obvious.
The
“butterfly vanes” approach is to have two pins poking upwards out of the chain
(from both outer plates on both sides of the chain), with the pins serving as
pivot axles for the “butterfly wings” (vanes), and each vane containing the
built-in hardstop for the other.

Figure #13
The
parent document mentions a “screw
turbine” as yet another energy-harvesting device. Now that I know that the windward side of a
re-entry vehicle has pressures roughly 100 times that of the lee side, and have
researched the state of the art for heat-tolerant materials, I believe that the
“screw turbines” idea (whether ducted or not) is a vastly inferior design, for
this application, compared to the champion, which is the paddle wheel. A screw turbine would require transferring
power away from the center-line of the device, which presents all sorts of
troubles, with obstructing airflow and with heat-sheltering components. I can speculate and provide drawings (contact
me as usual at RocketSlinger@SBCGlobal.net if desired), but
I think that the screw turbine deserves no more discussions or drawings here.
Hydraulics and Hydraulic Power Management
I’m an amateur here, as in so much else. Internet research (and the Mighty Google,
Which Knows All) empowers me here. Bidirectional hydraulic motors are clearly a
“thing”. At a casual glance, see https://www.globalspec.com/industrial-directory/bidirectional_hydraulic_motors. So, in the Bifrost hinge, we can do what we
want, there. One motor can be used to
open and shut the hinges.
For bidirectional hydraulic oil pumps, see https://www.rg-group.com/resources/blog/bi-directional-pumps, which says… “NOTE: Don’t confuse
bi-directional pumps with bi-rotational pumps. Bi-rotational pumps can flow out
of either port, but only when rotation reverses. A bi-rotational pump has one
port hooked to tank and the other port piped to the circuit.” Also it says “Normally, bi-directional pumps
do not have a port piped to tank.” So,
in the one and only place where I recommend the use of a hydraulic cylinder (in
the adjustable airflow dampener feeding the air to the paddle-wheel), we might
wish to go “closed hydraulic circuit” and use a bi-directional pump, to power
the cylinder, here.
As
far as the “tank” is concerned, to my knowledge, this is a general-purpose
reservoir of hydraulic fluid, which, unlike a “hydraulic battery”, doesn’t
place the fluid under high pressure. In
our application, though, we’ll have to deal with zero gravity, as in, for
example, when we first activate the Bifrost hinges (to open the petals), before
deploying the payload. We can’t deal
with “sucking vacuum” from the tank, because our oil is vacuum-cavitating and floating around in blobs. We’ll have to create a “tank” (which can have
weaker walls, unlike a “hydraulic battery”) which at least weakly pressurizes
the hydraulic fluid, behind a sliding wall, just like in a hydraulic cylinder, where
the wall is called a “seal” (or piston), usually, it seems. This will keep us from spilling the contents
of our tank, in zero gravity! On the
empty side of our seal, we can place (sealed) weak nitrogen pressure, or
mechanical springs. Use nitrogen here,
not air; we don’t want to risk burning our hydraulic fluid.
One
of the things that I am wondering about is, during the “rotisserie roll”, there
will be tremendous amount of air pressure pressing in against one
petal-becoming-a-grid-fin, as we retract it, and extend its neighbor. Instead of bleeding high pressure fluid back
to the (low-pressure) “tank”, and having to re-spend much energy fighting air
pressure on the neighboring petal as we extend it, can we switch high-pressure
fluid from the being-retracted petal’s motor(s), to the being-extended petal’s
motor(s)? Solenoid-switched fluid-flow
valves (including “check valves”) and switches are a given. In
electrical power management, we can combine a motor and a generator and create
an “alternator”. Can we do the same
thing in hydraulics, and create a combined hydraulic motor-and-pump? This would allow us to efficiently do the “rotisserie roll”, by
having one combined pump-motor supply the next, with high-pressure fluid, I
think.
The answer isn’t
immediately clear. https://en.wikipedia.org/wiki/Hydraulic_motor seems to imply that it’s
not easy to do that. https://www.plantautomation-technology.com/products/kazel-hydraulic/hydraulic-motor-pump-combination isn’t very clear
(probably involves electrical power). https://www.hydraulicspneumatics.com/technologies/accumulators/article/21883829/accumulators is
good background information on accumulators.
https://www.graco.com/us/en/in-plant-manufacturing/products/lubrication/automatic-lubrication/hydraulic-accumulator-supply-pumps.html
describes air-powered pumps to feed power to accumulators (that one’s not very
directly related to our application). So
in any case, in our “Bifrost Hinges” design, whether we need to combine a (birotational or bidirectional) hydraulic motor with a pump
(as 2 discrete units or as one unified unit), we CAN convert mechanical motion
(from relieving high fluid pressures as the petal retracts), to pump-power the
extension of the next petal. It CAN be
done! If “Graco”
can do it (pump hydraulic fluid) with air pressure, we can do it with hydraulic
fluid pressure.
Partially
repeated from a few paragraphs up, see https://www.rg-group.com/resources/blog/bi-directional-pumps, which says… “NOTE: Don’t confuse
bi-directional pumps with bi-rotational pumps.
(Deletions here). A bi-rotational pump has one port hooked to
tank and the other port piped to the circuit.”
So then, my question would be, when the petal is pushing in strongly on
us (and we want to allow it to retract), can we use a bi-rotational pump, and pipe
high-pressure fluid, not to the tank, but to an accumulator? Or over to the next petal
that needs to be extended? If the
answer is “yes”, then we are “home for free”!
We get to extract power as we retract!
If all
else fails, we can STILL do this job of recovering some power, I will bet! See some of the above drawings of the Bifrost
hinges (especially figures #2, 3, 5, and 8) and we can see that there are
multiple locations available, in the drivetrain, for pumps and motors. If need be, we could place a weak unidirectional
motor for powered retraction (as in a vacuum, for post-payload-deployment
petal-retraction, if desired, when the wind isn’t pushing us), plus a strong
unidirectional motor for powered deployment and place-holding (braking), PLUS a
pump, to extract power to be fed back to an accumulator, or to a neighboring
petal that needs extended, as we are retracting the strongly-being-pushed-on
petal on our given instance.
As I
understand it (I could be wrong), our strong unidirectional motor (in this
scenario) will be fed high pressure fluid-feed to push outward on the
petal. It will maintain that high fluid pressure
(from a pump and-or accumulator) in “braking” mode. Now we could suddenly relax that motor-brake
and feed excess fluid back to “tank” (don’t let the being-fed high-pressure
fluids short-circuit to tank), at roughly the same time as we engage the pump,
to turn strong mechanical energy (from the petal being pushed inwards by winds)
back into fluid pressure (fed to the accumulator and-or the neighboring petal
and Bifrost hinge, of course). That
should do it! (Parenthetically, in
electrical switching, especially with electromechanical relays, we talk of
make-before-break, v/s break-before-make connections. I don’t know what we’d do here with hydraulic
switching).
Certainty
concerning the above (or more details) are beyond me! No hydraulic circuits
drawings will be provided, at this time, from Yours Truly!
A
“hydraulic battery” will need to be thicker-walled (compared to a “tank”), to
contain higher pressures. See https://www.hydraulicspneumatics.com/technologies/accumulators/article/21882959/hydraulic-batteries-save-fuel “Hydraulic ‘Batteries’ Save Fuel”. I’m no hydraulics expert, but I’m willing to
bet that we need one (or more) in the systems envisioned here. What I can offer up,
is an idea: The air (or mechanical
springs, etc.) pressure in an accumulator could be indirectly replaced, in our
application, with the airflow pressure exerted by our vehicle’s re-entry. After our high-speed re-entry is done, of
course, our high-pressure source will be fading away, and our Bifrost-hinges-stored
hydraulic-fluid pressure (more importantly, also our stored potential
mechanical energy) will largely fade away with it also. But during the maximum-stresses parts of
re-entry, this scheme may work just fine.
That is, our
special accumulator is an “airflow spoiler” down on the flank of the rocket
body. That does means that we have to
move hydraulic fluids down there and back, in a heat-walled manner. I think (and hope) that this can be done
without invading the body of the rocket all that terribly much. We also assume that we can find a way to feed
hydraulic fluid pressures back and forth through a Bifrost hinge (see slightly
above) to substitute for air pressure in a hydro-pneumatic accumulator. The “accumulation” function is stored
potential mechanical energy in the form of the extended friction plates (or
pusher arcs) in the Bifrost hinges, which can pump fluid as they are pushed
back in by the strong prevailing winds, is another way to put it. Such a combined airflow spoiler and
accumulator could be located wherever best makes sense.
Figure #14
The
hinged plate should roughly conform to the rocket body, and be heat-shielded in
the same manner as the surface of the rocket body is heat-shielded, or
better. It is assumed to be solid planar
here, not a “grid fin”, although I suppose it could possibly be grid-fin-style,
as another choice. If it is solid
planar, it will gather a lot of force, and so, should be built thick and
rugged.
The
airflow spoiler could possibly be located near the bulge in the deck and the
petals, and the optional reducing air scoop; see figures #9, 10, and 11. The spoiler would perhaps protect the sliding
plate (airflow damper) and paddle wheel from too-strong airflows. If this is going to be a purpose of the
combined airflow spoiler and accumulator, the two sometimes-conflicting
purposes must somehow be balanced, of course.
The
spoilers might best be added in balanced pairs, to maintain overall
symmetry. Note also that the “power
storage” function here of a spoiler plate’s extension on a Bifrost hinge is
really the same as what we have in a petal-becomes-a-grid-fin and a Bifrost
hinge. The difference is that the former
isn’t envisioned as being part of the “rotisserie roll” function, and the
latter is. So the former is more purely
an “auxiliary power accumulator”. Once again,
all of this assumes that we can pull fluid-pumping power out of extended-against-the-wind
grid fins and spoilers, which I do firmly believe is a safe assumption.
Avionics and Flight Control
I’ve previously commented (both here and in the parent document)
about the “rotisserie
roll” and an associated corkscrew descent pattern for the entire vehicle. The avionics circuits (controlling the
hydraulics of course) may, from time to time, shift from overall flight-path
corrections as being the primary concern, to maintaining the rotisserie
roll. If all is working well, most of
the time, both objectives can be met at the same time. And as previously remarked, during the time
that the petals degrade and become grid fins, imbalances here can be corrected
by adjusting which petal is further deployed than another. I have nothing more to add to that, other
than the below…
Immediately
below Figure #8, I added comments about FOD (Foreign Object Damage), as
materials from degrading petals may get caught between elements of the Bifrost
hinge (of any design variation, really).
We should design to prevent this, both in the
Bifrost hinge, and in the materials that will ablate, burn, or fall away, as
petals degrade.
However,
we should probably design into the avionics, methods of getting ingested FOD
materials out of the Bifrost hinges. If
sensors (motion sensors, hydraulic fluid pressure sensors, strain gauges, etc.)
detect a “stuck hinge”, the hinge should be extended a bit, to see if that
fixes it (disgorge the FOD materials).
Make several attempts before giving up.
So along with maintaining the flight path and the rotisserie roll, this
might best be a third duty of the avionics circuits, with the duties
interleaved as need be.
Conclusions
“Bifrost Hinges” (in any of several design variations)
would make good powered hinges for a shuttlecock-style atmospheric
re-entry. Paddlewheels could be used to
collect power. Airflow spoilers could
serve combined purposes of slowing the descent (spoiling airflow of course) and
as “hydraulic accumulators”, which store energy in the form of potential
mechanical energy, as Bifrost hinges are extended against strong winds.
Open questions remain.
Can a port from a bi-rotational pump be routed to an accumulator instead
of a tank, thereby conserving power? Can
a hydraulic pump be combined with a hydraulic motor, without electrical power
being involved? Are the above design
notes optimal, especially concerning hydraulics? What would a detailed “hydraulic circuit”
diagram look like, for a Bifrost hinge?
I plan to see if I can get a hydraulics expert to comment. Maybe I’ll write or co-author another paper
to flesh this out some more. Please contact
me if you are (or know such) an expert who might be willing to comment,
contribute, or co-author. See my email
address immediately below.
I have
no special expertise or any more plausible ideas concerning any associated
matters here, so I will sign off at this time.
This concludes my ideas as of this time.
Comments or questions (or idea contributions) are welcomed at RocketSlinger@SBCGlobal.net …
Stay
tuned… Talk to me! RocketSlinger@SBCGlobal.net
References
Stauffer,
Titus. (2021). Methods of Decelerating a Spacecraft Through
Atmospheric Re-entry Using a Shuttlecock-like Design.
Stauffer,
Titus. (2019). Designs for Passively, Thermally Gated Fluid Flow Switches.
Back
to main site at www.rocketslinger.com